I just recently finished off my favicon and added it to the site. You can see the bigger version to the left. I should have done this earlier, but it's just one of those things you tend to overlook. It is, however a very important part of branding and identity for your site. Plus, it's so much better than the default icon!
So What is a Favicon?
Favicons are all those tiny graphics you see in your address bar, favorites, tabs and many more places. They are a small graphic interpretation of your logo or brand. They measure only 16px by 16px. Google thought so much of their's that they recently changed it to the tiny blue 'g' you see now.
How to Create a Favicon
There are numerous sites such as flavicon that can help you build these graphics, however I prefer to do it all through Photoshop, here's how…
1. Make a new document, size it at 64px by 64px. You will have to scale it down at the end, but this is a good size to start, it will give you an idea of how it looks as your design process goes along.
2. Design a small graphic or icon that represents your site. There are two main things to keep in mind while doing so. The first is consistency, keep it consistent with the rest of your site. You don't want a tiny icon that doesn't make sense with the rest of your theme. The second is simplicity. In the end this icon will size at 16px by 16px, so keep it as simple as possible. Full words or many different colors will render poorly at this size.
3. Once you have a design that you are comfortable with, it's time to see how it looks really tiny. In Photoshop click image->image size and change the dimensions to 16px by 16px. If it doesn't look good at this size, then it's time to go back to the drawing board.

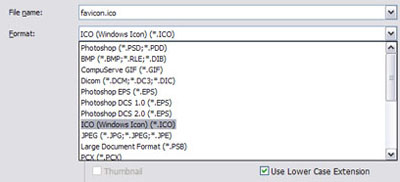
4. Next, you will need to save the file in windows icon (.ico) format. To do so you will need to download a plugin. Head on over to telegraphics, they have a free download there that you can use. Once the download completes, unzip the file and place it in your Photoshop File Format folder. In windows this is usually (depending on where you installed things) located in C:Program FilesAdobeAdobe Photoshop CS3Plug-InsFile Formats.
5. Now save the file. It must be called favicon.ico for browsers to find it. It should be noted that some older browser don't show favicons, but most do, I recommend using Firefox.
6. Now open up your favorite HTML editor and locate which ever file has your head tag information. For instance if you are running a wordpress blog, that info would be in your header.php file. If you are using something different or writing the site from scratch hopefully you know how to located where these tags are. Once you have that open, insert the following code: (if you saved the favicon in a different location make sure to change the reference to the image.
7. Lastly open up your ftp program or what you use to upload files to your server and upload the favicon icon and the header file. Sit back and check out your lovely new icon.
0 Responses